- Whatsapp: 8618958900507
- Email: [email protected]


In fields like chemical engineering, water treatment, food processing, and petrochemicals, pipeline systems rely on elbows to change the flow direction of fluids. Pipe elbows are super crucial connecting parts in the whole pipeline system. Their welding quality directly decides whether the whole pipeline can run stably and lastingly. If the elbow welding process doesn’t meet the standard, problems like internal cracks, leaks, corrosion, and deformation are likely to occur.
This article has sorted out the complete welding and installation steps for stainless – steel elbows for you. It covers stuff like pre – welding preparation, standard welding operations, on – site quality inspection, defect handling, and quality acceptance standards. Whether welders are working on small – diameter thin – walled elbows or large – diameter thick – walled elbows, as long as they follow this process, the whole stainless – steel pipeline construction will be more standardized and professional.

Before starting the actual welding, if you do a good job in preparation, you can avoid more than 60% of common welding problems in advance.
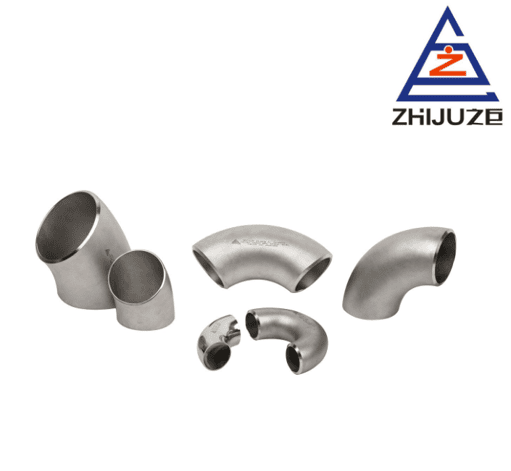
Before construction, you have to refer to the construction drawings and count and classify the specifications of all pipe fittings in advance. The commonly used mainstream sizes in the market include:
3/8 – inch 90 – degree pipe fittings, 3/4 – inch 90 – degree pipe elbows, 1 1/4 – inch 90 – degree pipe fittings, 3 – inch 90 – degree pipe fittings, and 4 – inch 90 – degree pipe fittings. These are all common 90 – degree stainless – steel pipe fittings. Different pipe diameters and wall thicknesses are suitable for low – pressure, medium – pressure, and high – pressure pipeline conditions respectively.
All elbows must be checked one by one before welding.
Check the inner and outer surfaces to make sure there are no scratches, oxidation pits, rust spots, deformation, or any other defects.
Use a caliper to accurately measure the outer diameter and wall thickness of the pipe mouth to ensure a perfect match with the straight pipe.
Use special stainless – steel sandpaper to grind the weld groove and completely remove oil stains and oxide scale.
Strictly reserve the joint gap according to the construction standard to prevent burn – through due to an overly large gap.
After finishing all the preliminary preparation work, you can start the welding operation according to the standard process.
For all kinds of stainless – steel elbow pipe fittings, to ensure no defects during the welding process, you need to adjust the welding method according to the pipe diameter:
Small – diameter elbows (3/8 and 3/4 – inch 90 – degree elbows): Use argon arc welding for the bottom layer, reduce the welding current, and slow down the welding speed to prevent the temperature from getting too high.
Medium – sized elbows (1 1/4 – inch 90 – degree elbows): Appropriately increase the argon outlet flow to protect the back of the weld and prevent the inner wall of the pipe from oxidizing and turning black due to high temperature, ensuring the quality inside and outside the weld.
Large – diameter elbows (3 – inch and 4 – inch 90 – degree elbows): Use the multi – layer and multi – pass welding process. After welding each layer, completely remove the slag to reduce internal defects like slag inclusions and impurities.
The arc – shaped corners of stainless – steel elbows are most likely to have welding defects, so you must pay special attention during construction.
When the welding torch reaches the arc – shaped transition position, you should appropriately reduce the welding speed.
Keep the welding torch swinging evenly and gently to ensure the same penetration depth on both sides of the groove.
Avoid staying in the same position for a long time to prevent the pipe wall from thinning, which may lead to incomplete fusion or dents.
After the elbow welding is completed and naturally cooled, a comprehensive quality inspection must be conducted. This primarily involves detecting surface and internal hidden defects in the welds to ensure safe operation of the pipeline in the future.
On-site inspection of stainless steel 90-degree elbows after welding is divided into three categories: visual detailed inspection, non-destructive testing, and sealing pressure test.
Visual Inspection
Using a 5–20x magnifying glass and a dedicated weld gauge, carefully examine the weld surface for undercutting, depressions, porosity, or fine cracks, while accurately measuring whether the weld width and reinforcement height meet specifications.
Professional Non-Destructive Testing
Utilizing various inspection methods to detect internal issues invisible to the naked eye: X-ray testing reveals the distribution of internal weld defects, ultrasonic testing precisely locates defect depth, and magnetic particle testing specifically identifies fine surface cracks on elbows.
Sealing Pressure Test
Verify the seal integrity using hydraulic or pneumatic pressure testing: hydraulic testing uses 1.5 times the working pressure, and pneumatic testing uses 1.25 to 1.5 times the working pressure.
| Inspection Item | Qualified Standard | Disposal of Unqualified Products |
| Weld appearance | Smooth transition, no undercut, crack or air hole, size within tolerance | Local polishing repair or cutting re-welding |
| Internal NDT result | No over-standard inclusion, incomplete fusion or penetration crack | Grind and re-weld after removing defective weld metal |
| Sealing performance | No continuous water seepage or air leakage during pressure maintaining test | Cut off the failed elbow and replace with new stainless steel elbow fitting |

When doing welding work at construction sites, there are often several common problems with the welds of pipe elbows. By mastering the quick repair methods for these common defects, you can significantly cut down on rework and shorten the overall construction time:
Edge undercut defect
This problem is mainly caused by excessive welding current or the welding gun moving too fast. The repair method is pretty simple. First, use sandpaper to smooth out the dents and the edge undercut areas. Then, turn down the current and slowly weld again to make the weld edge transition smoothly.
Weld porosity
This is mostly due to the elbow groove not being thoroughly cleaned, leaving behind oil stains, or insufficient argon protection during welding. During rework, you need to re – sand and clean the welding area and increase the argon protection to keep out the air and prevent the pores from coming back.
Internal cracks
This kind of problem usually shows up in the curved parts of stainless – steel elbows and is a relatively serious defect. You can’t just fix it by welding. You have to completely remove the cracked area, re – grind the groove, and start welding all over again to get rid of the crack risk.
Welding penetration problem
This defect is more common in 3/8 – inch and 3/4 – inch thin – walled 90 – degree small elbows. Since the pipe wall is thin, the high temperature during welding can easily cause penetration. During rework, you should lower the welding current, shorten the single – point welding time, and control the temperature of the molten pool.
What materials should we ask the manufacturer to provide when purchasing stainless – steel elbows and pipe fittings for a project?
A reliable supplier should always have complete quality inspection materials, including appearance inspection reports, non – destructive testing data, mechanical property test results, pressure seal test records, and all other relevant documents.
Are the post – welding inspection standards the same for small – diameter and large – diameter elbows?
The basic inspection methods are exactly the same, but the pressure test parameters and the allowable range of minor defects will be adjusted according to the elbow size and the design pressure rating of the pipeline.
How long after the elbow welding is finished can we do the pressure test?
After welding, you have to let the component cool down to room temperature naturally before doing the pressure test. If the pipe fitting is still hot, the remaining internal thermal stress can affect the test result and make the sealing performance data inaccurate.
The whole construction process of stainless – steel elbows includes pre – classifying and preparing various types of elbows (like 1 1/4 – inch and 3 – inch) before welding, standardizing the welding operation, and conducting multiple on – site quality inspections and defect repairs. This process builds a complete closed – loop quality control system for pipeline construction.
Whether it’s the thin – walled small – diameter elbows for food pipelines or the thick – walled large – diameter stainless – steel elbow fittings for chemical high – pressure pipelines, as long as you follow this process for construction and acceptance, you can ensure the long – term stable and safe operation of the whole pipeline system to the greatest extent.
Among many pipe – fitting manufacturers, ZHIJU can provide products in various specifications and standardized formats, along with complete quality inspection documents and construction technical guidance, which can significantly reduce the difficulty of on – site welding, acceptance, and rework. If you need high – quality stainless – steel elbows that meet your project requirements or want professional welding and quality inspection support, just contact our team. We’ll customize the most suitable pipe fittings and construction plans for you according to your pipeline parameters.

THE QUALITY IS THE SOUL OF AN ENTERPRISE
Zhejiang Zhiju Pipeline Industry Co., Ltd
Official Website: https://www.zhiju-steel.com
Privacy Policy
Copyright ZHEJIANG ZHIJU PIPELINE INDUSTRY CO., LTD SUPPORT BY :JUNJ